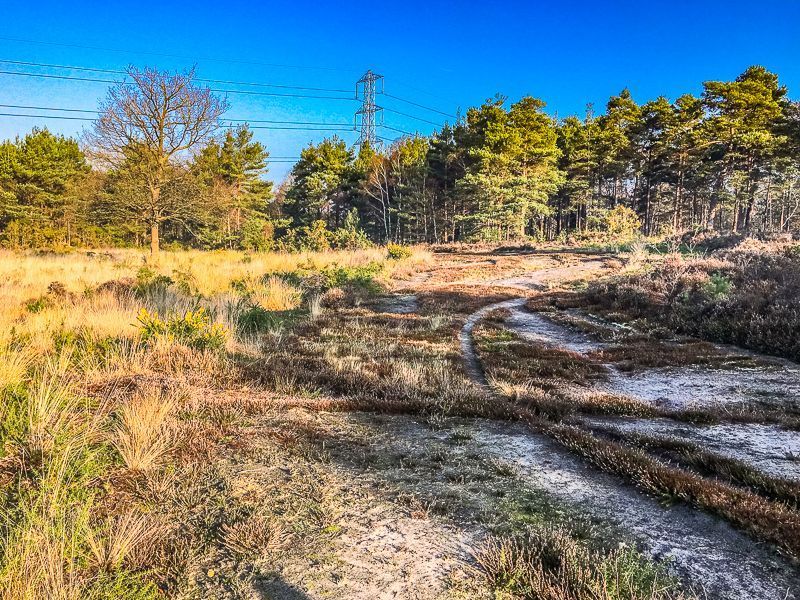
We have all done it – taken a landscape picture when out in the beautiful countryside only to be disappointed when we look at it in the cold light of day. You probably feel that the camera did not capture what you saw and felt and, well, it just doesn’t look that good. Now here’s the crunch, a picture that doesn’t communicate your feeling and the moment is less about the camera and the poor light, and more about what you included in the image and how you took it. After all, cooks do not say that the great food they served was because they own an excellent oven and knives. Good photography is like good cooking – more about how and what you do than the tools you use. So, here’s a few tips that may help you create beautiful landscape pictures that you will enjoy sharing with your friends and family.
#1 Take Pictures in Landscape, not Portrait
This first rule is quite simple. In most cases take the picture in a landscape rather than portrait orientation…. Yes, the clue is in the common name we use for having the image wider than it is tall. Of course, there will be times when you do want to capture the winding path up the hillside, the grandeur of the tall trees and the sheer beauty of the full height of the mountains. However, in general, taking landscape pictures in a portrait mode should be a choice, not the starting position, when you raise your camera to take a picture of the beautiful landscape. Long on the top is best.

#2 Zoom out or use a Wide-angle Lens
Landscapes tend to look good and convey their beauty when you capture more rather than less. So, in addition to taking the picture in landscape, it’s also often best to zoom out. If your camera allows you to change lenses, then a wide angle lens is usually best. In simple terms the lower the number, the wider the angle. So a 25mm lens will capture more of the scene ahead than a 50mm or 90mm lens. If you are using a mobile phone to take pictures you will already have quite a wide lens normally it will be a little bit wider than a 35mm lens on a full-frame film camera.
You may feel that ‘shooting wide’ means that you cannot make out some of the most exciting features in the resulting picture. This could be true but remember that you can always zoom in after you take the picture and crop the picture to discard that parts of the image you do not want. But you cannot zoom out and include parts of the landscape that were not captured in the original picture. Shooting wide is best.
#3 Change the Height of the Camera – Low Level and High Level
Something we all tend to do is to take the picture from our eye level. This is especially true if you have a camera with a viewfinder. A good habit to get into is to try and take some of your images from different heights. A low-level picture can often capture a little more drama as well as add some foreground and depth. A high-level picture can help you miss out some less desirable elements of a picture such as a fence or a muddy part of the track. If you have a camera with a ‘tilty, flippy screen’, it makes things so much easier as you can hold the camera higher and you also do not need to crouch or kneel to capture a low-level shot. Vary the height when you shoot the scene.


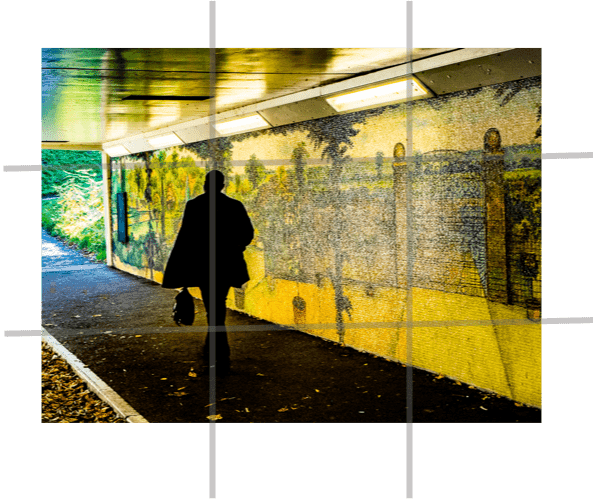
#4 Utilise The Rule of Thirds
The rule of thirds is an imaginary noughts and crosses board that is drawn across an image to break it into nine equal squares. The four points where these lines intersect are the strongest focal points. The lines themselves are the second strongest focal points.
Another way to use the rule of thirds in photography is to divide your scene into areas or zones rather than using the intersecting points of the grid. Landscapes often naturally create zones such as the sky, hills and the foreground.
So imagine two lines running across your frame that divide it into three equal sections (These lines can run either horizontally or vertically, but you will probably find that with landscapes it will be best if they are horizontal).
Then when composing, fill each area with a different portion of the overall composition. Use the rule of thirds to make your pictures more appealing

#5 Check the Edges
When you are composing the picture, don’t just focus on the main subject or even just the rule of thirds make sure that you check the edges of the pictures to make sure there is nothing that you would prefer to keep out of the picture. For me this is sometimes our dog, Bobbie, just sneaking into the bottom of the picture as she is keen to move on and continue the adventure. Scan around the edges to check for unwanted object.
#6 Include Near, Middle and Far Objects
To add depth to your picture, try and include something in the foreground to give your picture more depth. This can be a clump of grass, gate, fence, tree branches, rocks etc. I think that some photographers purposely take a picture without very much in the foreground to try and show the dramatic extent of the landscape. But this can often have the opposite effect and the image looks flat. Making sure that the picture has a shape or object near, a discerning element in the middle as well the distant horizon will make your picture a lot more pleasing to the eye and tell a better story. Include the near, the middle and the far.

#7 Use Post Processing
Post processing is often misunderstood by some photographers saying the picture is better straight from the camera and ‘not messed about with’. I have to say that this is a little bugbear of mine for two reasons. First, it has already been processed by the digital camera…. a jpegJPEG is an acronym for Joint Photographic Experts Group and the standard format in which pictures are compressed. Due to this compression, JPEG files are smaller and carry less information. Sometimes also denoted as jpg or jpeg. More image created in a camera will have been processed to a greater or lesser extent, so perhaps unlike film, the resulting unprocessed image is not ‘old school photography’. Second, unprocessed images are not more like the view that you saw when you took the picture. Eyes are very sophisticated and are taking in a huge amount of information and processing it in your brain. You do not just open your eyes and shut them again – like a camera. Your eyes move and constantly modify the amount of light you receive – so when you look at a landscape in normal light conditions the sky is not ‘overly bright’ and other parts of the view ‘too dark to see’ or out of focus.
Processing your image is the right thing to do – you can choose how you want the picture to look and make sure the colours are true (white balanceThe camera’s ability to correct colour cast or tint under different lighting conditions including daylight, indoor, fluorescent lighting, and electronic flash. Also known as “WB,” many cameras offer an Auto WB mode that is usually quite accurate. White balance can also be adjusted in the post-processing of digital images in software such as Lightroom More), exposureThe amount of light that reaches the film (or camera sensor). It determines how light or dark an image is. The exposure of an image is determined by the aperture, shutter speed, and film speed (ISO). During exposure, the sensors or chemicals on the film in analogue models, are subjected to the light outside the camera for a certain time. More is correct across your picture, the composition is optimised by cropping if required, etc. Process your images to get a true reflection of what you saw and how you felt.


#8 Look for Diagonals
Another way to add some depth to a landscape is to look for some diagonals in the image that lead the eye from the foreground to the horizon. This could be a road, fence line, river, change in colour, etc. I prefer the diagonal to go from the bottom left of the picture – but it’s only a preference… Look for patterns and shapes in your landscape photography.

#9 Correctly Frame Motion into the Picture
Often there is no motion in a landscape image other than perhaps some trees blowing in the wind and water flowing in a river or stream. If you are able to add some motion maybe a person walking, a dog running or a horse galloping, think about where they sit within the image. The rule of thirds is important but should also think about the space either side of the object. In most cases, you want to leave space in your image for the subject to move into. So if a dog is running from left to right try and keep the hound in the left hand third of the picture. You will be surprised how much difference it makes… Give the subject room to move into…

So there we have it #9 simple rules that can help you improve your landscape photography. And to round up one last tip… Keep taking pictures whether it be more pictures of the same scene or more pictures of different scenes – snap away and then look at what you have created with a critical eye and give your self some feedback – two or three things you like about the picture and two things you are not so keen on…
You can view some of the Landscape pictures I have taken on our sister website Photo Walk UK.